The best method in which the shooter can impart all of his shooting skill to his shooting is by careful organization of maximum control.
Most of the points lost in an aggregate score are slow fire points. It is therefore imperative that this stage of fire become the first goal of exact control. One shot in one minute is sufficient time to organize the delivery of each shot. Successful delivery is assured when control of the cycle of action and thought is uniformly established - prepare, plan, relax, deliver, analyze and correct.
A. PREPARATION
Complete preparation and prior planning is essential. The firer must be both mentally and physically ready. So that he can concentrate on performance he must have checked the range conditions, his equipment, zero of weapons, range commands, ammunition, etc. prior to actual participation on the line.
1. Zeroing:
As a competitive shooter you must know how to zero your weapon in order to place the strike of the bullet in the center of the target.
There is no excuse for losing points in competition due to an improperly zeroed pistol. Inexact zeroing is a demonstration of lack of preparation.
a. There are two types of sights, fixed and adjustable.
(1) You may have fired a pistol with fixed sights. It could be that you are using a pistol with fixed sights now. The fixed sights found on the . 45 caliber service pistol are somewhat difficult to adjust and therefore not primarily used for competitive shooting. For elevation correction, you must use the trial and error method of changing the sight height with a file, or, if a good armorer is available, he will be able to cut off the exact amount from the sights. Windage must be corrected by moving the rear sight with either a sight mover or a hammer and punch. You cannot have both a 25 yard and 50 yard zero in elevation with fixed sights. Your point of aim at 50 yards will be higher than at 25 yards. Correcting for windage with a fixed sight is very difficult due to the method used. Except for initial determination of normal zero for ideal conditions, it is recommended that fixed sights not be moved during competition.
(2) Most pistols that are used in competition today are equipped with adjustable sights which are easily moved by a screwdriver or a small coin.
(a) There are many makes of adjustable sights available on the market today. The sight adjustment screws do not all move in the same direction for a given adjustment. Clockwise will move one sight to the right and move another sight to the left. This also applies to elevation adjustment. Another difference is that each sight does not move the strike of the bullet the same distance per click. Some of these sights are more durable than others.
(b) The primary consideration when you are using adjustable sights is that you know the capabilities of your sights. How far one click in elevation moves the strike of the bullet at 50 yards, etc., on your pistol, is important to correct zeroing and adjusting.
(1) We recommend that you start your zero at twenty-five yards. Fire at least three rounds slow fire before moving the sights.
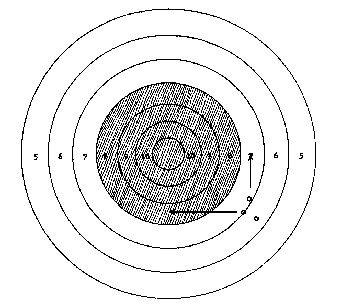
Figure 4-1. Sight Change Example.
(2) Check your group in relation to the center of the target and if necessary, make a bold sight change. Do not creep to the center of the target one click at a time. Also, repeat the shot group method to establish a 50 yard zero. Do not try to zero by moving your sights after you have fired only one round. One round can easily be off because of errors committed by the shooter.
The shot group is equivalent to an 8 ring or a four inch error at 6 o'clock in elevation. If the sight moves the strike of the bullet one-half inch per click at 50 yards - approximately eight clicks increase in elevation are needed. The group is equivalent to 7 ring or five and one-half inch error in windage at 3 o'clock, approximately eleven clicks of left windage are needed. (Refer to scoring ring dimensions in Sight Adjustment Card)
(3) Exception to the shot group method may be made when a shooter with extensive experience is firing in a match and has called his shot good, but the shot was not located on the target in relation to his call. Analyze your shooting performance. You may determine that an immediate sight change is necessary, but do not be in too great a hurry to move your sights, as the chances for error caused by faulty technique are many.
(4) When the group is centered you may wish to fire 10 and 20 second strings to confirm the zero at 25 yards. There will possibly be a change required when shooting timed and rapid fire.
(5) Never "Hold Off" or use "Kentucky Windage" with adjustable sights. The shooter will force the shot to break at a specific spot instead of allowing the normal arc of movement. If you are grouping away from the center of the target, adjust the sights to compensate for the error. Mark and record your zero sight settings
(a) It is a good idea to mark the sight adjustment screw with a small drop of nail polish or airplane dope to indicate the position of the 25 yard and 50 yard zero.
(b) You may also set the elevation screw down to its lowest point, counting the clicks as you do and record the number of clicks up from the bottom for both settings, This way you record the number of clicks from the base of the sight up to your 25 yard and 50 yard zero. (This method is used only for elevation. )
(c) You may also make a sight adjustment card on which you can record the zero position of the windage and elevation screw for all weapons. At certain times on different ranges, and under various weather and light conditions, you may find your zero changes slightly. (Figure 4-2).
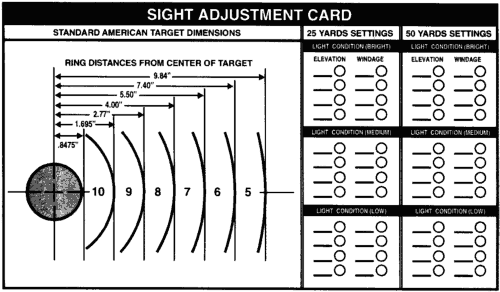
Figure 4-2. Example of Sight Adjustment Card.
(6) A scorebook which has provisions for you to write in your sight settings for specific ranges, light and weather condition, and hard to remember data is a necessary item of equipment (Figure 4-4). Unusual zero changes frequently appear without reason. Some things to check are as follows:
(a) Check the spotting telescope: You may be scoping the adjacent target. Adjusting your zero to compensate for another shooter's grouping frequently happens.
(b) Check front and rear sights. The sights may have become loosened from the recoil or bent or damaged. The rear sight may have worn notches in the adjustments and would allow recoil to disturb the sight setting or when an adjustment is attempted, the sight would not move in the desired direction.
(c) Errors in position and grip may cause the hold and sight alignment to drift even though the shooter may have made a correction. An artificial correction is made to compensate for errors. At the shoulder it affects the hold, and at the wrist it affects the grip. An integral shift in body position should be made by moving the rear foot in the direction of the error in the hold and the grip should be shifted by sliding the grasp of the hand on the grips of the weapon toward the error. If a natural position and grip are attained, the tendency to point at other than the aiming point will be removed.
(d) Positive action is urgently needed when any of the above situations are present. Make a quick check of the scope, position, and grip and then continue until it is apparent that the difficulty is not being remedied. A bold change in sight setting should now be made.
(e) In the case of a sight damaged beyond use, ask the range officer to permit you to declare the weapon disabled and change guns or have it repaired by a qualified gunsmith on the range.
(f) The scorebook may indicate a large change in sight adjustment for the pistol range on which you are firing. Changes in light angle or light intensity may affect the zero that you use on the home range.
(7) Upon completion of firing, a consultation with your gunsmith might uncover certain changes in the fitting of components, wear, burrs or foreign matter that can alter the mating of finely fitted parts. Any of these may cause a change in zero.
2. Preparation in the Assembly Area: Before you can employ a systematic technique of shooting, a systematic preparation phase must be established. Actually the shooter's over-all preparation starts the first time he attempts to improve his shooting ability. However, important steps can be taken during the period immediately before shooting that will favorably affect control and coordination.
a. Physical: The shooter must first complete his preparation in order to fully concentrate on shot delivery. The important thing to remember is to perform all operations and checks before record firing. Otherwise, the shooter will have to alter his system of control to compensate for the time lost in searching for an emergency solution.
(1) A shooter should eat light but nourishing food so that there will be no feeling of hunger before shooting, or a sensation of being stuffed. Avoid drinking a lot of water before and especially during shooting. Heavy food and too much liquid raises the pulse beat and induces excessive perspiration, thus weakening the body during shooting.
(2) Before shooting the shooter should do mild limbering up exercises: static tension exercises, walking, dry firing, etc., will revive blood circulation after sleep and help balance the nervous system. If a shooter starts shooting shortly after awakening, without limbering up, he will not be steady. His reactions are too slow, and his movements will lack coordination.
(3) The shooter should report to the range at least 15-30 minutes prior to firing time. This is necessary for equipment preparation and the shooter will also have a chance to relax and become settled during this period. Carrying a heavy gun box puts a strain on the shooter and no effort should be made to shoot for a period after such exertion.
(4) Checking the firing point from which a competitor will shoot must be given due attention.
(a) The shooter must choose the best place to shoot from. On a bright day, for example, the position should be slightly back, to allow shooting from shadow if possible, or he must place himself to the rear of his gun kit so as to be in its shadow. Establish your position in such a way that it will not be necessary to change once the shooting begins. Shooting glasses to prevent the sun from shining into the eyes should always be used.
(b) Frequently, the surface of the firing line has bumps, slopes, and other irregularities in it. In order that there be no unevenness on the firing line to interfere with a proper position, a shooter should level his area, scraping smooth the bumps or filling in the depressions with loose dirt or gravel before shooting starts.
(5) Before arriving at the firing line a shooter must have previously inspected his clothing and shoes carefully for comfortable fit.
(6) Before your relay is called you should move your equipment to a location directly behind your firing point. Make a final check to be sure you have the proper weapon, magazines and ammunition. Blacken your sights with the carbide lamp and make sure the sight setting is correct. Clean your shooting glasses, check for a pencil, screw driver, ear plugs and stop watch. Listen to the range commands and observe the range operation. Be aware of conditions and adapt your performance to take advantage of knowing beforehand the conditions under which you will have to fire. For example: Check for rapidly spoken fire commands, evaluate the wind and light by observing the effect on previous relays, etc. As soon as you are satisfied that you are familiar with the range and range operation, you should mentally review each step you must go through in delivering a good shot.
b. Mental: At the beginning of a shooting day it is a good idea to concentrate on planning each shot as a prelude to actual firing. Experienced shooters as a rule, take into account their feelings, energy and fitness and plan a definite method for themselves.
(1) Stimulate your confidence by developing a conviction that a controlled, uniform and exacting performance will produce good scores. Accept scores that are within your ability to hold. Confidence is a deciding factor. You will achieve a flawless performance if you are convinced you are capable of winning the match.
(2) Prior planning of your actions in the delivery of each shot will minimize the destructive effect of tension and pressure.
(3) Delay and irregularities in range operation upset some shooters. Remain relaxed and exercise patience.
(4) When you are shooting, you must think shooting, and only shooting. Be mentally alert and remove all stray thoughts from your mind. Condition your mind to concentrate on the match.
(5) Mentally review the entire shot sequence, with emphasis on how you are going to perform each act.
3. Preparation on the firing line: Having made sure that we are prepared to shoot the match, the shooter sets up his gun box and scope and makes a final check of his weapon, equipment, and of himself. (Refer to "Three Minute Preparation On The Firing Line Checklist" Figure 4-3).
a. Check your squadding ticket and place your shooting box on the correct firing point. This eliminates the unnecessary shuffle when another competitor informs you that you are on his firing point. Make sure you are correct and let him do the walking.
b. Set your scope on your target.
c. Scope your target and inspect for holes. Notify range operating personnel if the target is not ready for firing.
d. Adjust ear protectors.
e. Load magazines with proper caliber ammunition.
f. Make a final check of your weapon to see that the sights are still blackened. If the blacking has been rubbed off, then re-blacken at this time.
g. Place all of your accessory shooting equipment that is located in the gun box on the shooting bench where it will be immediately available.
h. Most top shooters use approximately three minutes to carefully check out stance, position, and grip. Simultaneously, with this checking process, the shooter should be very careful not to shorten the depth of his breathing and at the end of the preparation sequence, should breathe deeply two or three times.
4. Preparations after the command "LOAD" has been given.
a. Upon the command to "LOAD", assume the stance, position and grip that you previously checked out to be correct. Verify this by extending the arm to check for a natural center hold and sight alignment with the target.
b. Load your weapon: Pay particular attention to see that the magazine catch has engaged the magazine. Failure of the weapon to load, caused by the magazine being partially placed in the weapon is not a valid reason for an alibi.
c. Keep the weapon pointed downrange.
d. With the non-shooting hand, grasp the weapon by the barrel or slide. Recheck for a good comfortable grip on the weapon. Check the position of your trigger finger. Extend the shooting arm briefly again to check if the hold and sight alignment are naturally obtained.
e. Check again that you are lined up on proper target.
f. Relax with the pistol muzzle touching the bench.
g. Continue the mental process, knowing that you are prepared to do the job. Mentally review the sequence of events necessary to deliver a correct shot or string. Concentrate on shot sequence. Visualize perfect sight alignment.
A checklist that can be stapled inside the lid of your gun box is recommended for use during all preparation.
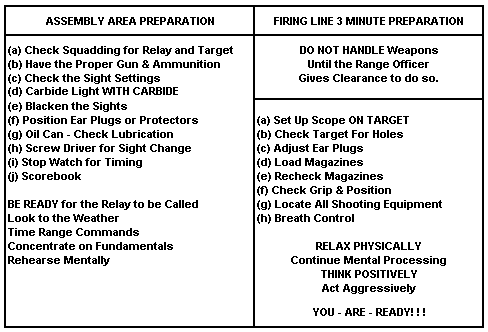
Figure 4- 3. Preparation Checklist.
5. The items that are important aids to the shooter should be present and operative prior to shooting.
a. Carbide Lamp with Carbide: This small item may be termed one of the most important accessories in the shooter's kit. But it does not work without carbide. Be sure the lamp Is ready and spare flints and carbide are on hand.
b. Magazine: Extra magazines are necessary to insure continuous operation. Be sure they are clean, operative and on hand in the gun box.
c. Ammunition: Have the correct amount and caliber of ammunition for the match being fired. Include enough for re-fires due to malfunctions, range alibis, etc.
d. Pencil and Score Book: Have a pencil or pen on hand. In some matches you will be called upon to score. Your scorebook should always be kept up to date whether in practice or in a match.
e. Ear Plugs: Protect your ears at all times from possible damage and eliminate breaks in concentration by closing out gun blast and extraneous sounds by use of ear protection.
f. Glasses with Cleaning Tissue: Colored lenses afford glare protection and are designed to let in only glare-free light. Corrective, plain or colored glasses also protect the eyes from possible damage from ejected shells, etc., and should be worn at all times when on the line. Use them to best advantage by keeping them clean. Have lens tissues In your kit.
g. Screwdriver and Tools: Sights were made to be moved. Tools that will prove useful are: cleaning rod, barrel bushing wrench, alien wrench set and screwdrivers. Be sure they are all on hand.
h. Weapons and Magazines: A properly cleaned and lubricated weapon will have much less chance of malfunctioning. Look and see If you have clean magazines for the correct weapons.
i. Squadding Tickets: It is best to rely on your squadding ticket to Inform you of your firing point and correct relay. Do not rely on memory. Keep them on your person or in your gun box at all times.
j. Stop Watch: A stop watch is an efficient means to pace your shooting during slow fire.
k. Sight Setting: Check to see if you have the sights set for the range at which this match will be fired.
l. Lubrication: Have a can of light machine oil available.
As a student of advanced pistol marksmanship, there should never arise any circumstances under which the results of your efforts are jeopardized by your failure to make complete and painstaking preparation.
B. PLAN SHOT SEQUENCE
There must be a systematic approach to obtaining shooting control. To successfully employ the fundamentals the shooter must develop a plan of action and fix it so firmly in mind that distractions do not interfere with his ability to follow a planned sequence. Simply giving yourself the order to watch the sights hold, and squeeze is not sufficient.
A shooter with natural talent may find it possible to occasionally fire good strings without having a plan of action. But regardless of his talent his performance is going to be erratic until he uses a comprehensive plan.
The shooter must realize that his ability to consistently perform well under pressure is related to the uniformity of his preparation. A planned sequence of thinking that will guide his physical actions through the complete string of fire is absolutely necessary.
You must control your mind and stop disconcerting thoughts of the possibility of failure. Picture yourself as you felt and thought while firing good strings and then ask yourself what technique you were using that enabled you to employ the fundamentals so successfully. The difference between champions and the also-rans lies in the ability to control thinking and plan actions from this point on. Prior planning of the delivery of the shot is the shooter's only insurance that the delivery will be consistently controlled. Knowledge of a successful shot sequence is the basis of the plan. The best assurance that a good performance can be duplicated is that the action follow a uniform sequence.
1. Remind yourself that when you consistently controlled your shooting you were using a shot sequence. You proved that there is a shot sequence that will work successfully for you. You must recreate precisely those same conditions to get the same results.
The course of fire may have a successful conclusion only if the shooter in setting-up each shot, goes through all the stages - getting completely ready, planning, relaxing, and delivering the shot, analyzing and correcting in the same manner each time.
2. The following sequence is recommended for slow fire:
a. Extend arm and breathe.
b. Settle into a minimum arc of movement.
c. Pick up sight alignment in the aiming area.
d. Take up trigger slack - apply initial pressure.
e. Hold breath.
f. Maintain sight alignment and minimum arc of movement.
g. Start positive trigger pressure.
h. Concentrate point focus on front sight.
i. Follow through. (Occurs with surprise shot only) (No reflex action)
3. The following sequence is recommended for timed and rapid:
a. Extend shooting arm and breathe.
b. Find sight alignment.
c. Find aiming area on edge of target frame (final deep breath).
d. Settle into minimum arc of movement.
e. Point focus of front sight (Partly release breath).
f. Take up slack - apply initial trigger pressure.
g. Maintain sight alignment (target faces).
h. Start positive trigger pressure.
i. Concentrate on sight alignment (first shot is fired).
4. When a shooter has a system to follow, he can concentrate on performance and not be worried about results. Care should be taken during early stages of instructional practice to comply with each of the items on the shooter's worksheet. As the shooter becomes more capable, sequence, analysis and corrective action becomes more important. Repetition of these steps will instill in the shooter good habits that will enable him to repeat good performance. Further, the worksheet will help the shooter form the habit of not overlooking any factor that will help his shooting. Winning scores are produced by being ready, confident, performing uniformly and being in complete control.
C. RELAXATION
1. Relaxation is best achieved by methodically bringing about a loosening of the muscular masses of the body. Think of the neck muscles, the shoulder, back, abdomen, buttocks and upper legs. Systematically reduce the tension of these members to one of support of an upright stance only.
2. A relaxed muscle does not become as tired as quickly as a tense one. It is also important to rest and relax after two or three shots during slow fire.
D. DELIVER SHOT OR STRING OF SHOTS ON TARGET
The successful delivery of an accurate shot on the target, embraces the proper employment of all the fundamentals. Do not compromise. Follow through and continue to apply all control factors. If the shot is fired as a surprise, there will be no reflex action. When you are absolutely sure you have set up conditions for a controlled shot, put your plan into action. Confidently and aggressively follow each mental step with physical action until the sequence is complete and the shot is delivered on the target.
Remember that in slow fire you do not have to shoot before bringing your gun down to rest. When you fatigue, run short of breath, experience difficulty in maintaining concentration on sight alignment or cannot maintain a suitable arc of movement, lower the weapon to the bench and relax. Re-plan the delivery of the shot, breathe deeply and try again. Some excellent slow fire shooters try two or three times before being able to deliver a controlled shot. Full control of the application of the fundamentals insures the correct control of a shot.
1. Example of a system delivering rapid fire strings with fire commands: As the Range Officer starts his commands, he will announce:
a. "ON THE FIRING LINE, FOR YOUR FIRST STRING OF RAPID FIRE,WITH FIVE ROUNDS LOAD."
(1) You should load at this time and assume your grip.
b. "IS THE HE LINE READY ? "
(1) Continue your rhythmic breathing.
(2) Check that you are going to shoot on the proper target.
c. "READY ON THE RIGHT. "
(1) Extend the arm with a stiff wrist and a locked elbow.
(2) Align the sights.
(3) Breathe deeply and exhale.
d. "READY ON THE LEFT. "
(1) Find the aiming area on the edge of the target frame.
(2) Take a final deep breath.
(3) Settle into a minimum arc of movement.
e. "READY ON THE FIRING LINE. "
(1) Partly release the breath and hold the remainder.
(2) Point of focus is on the front sight.
(3) Take up the slack - apply initial trigger pressure. (4) Maintain sight alignment.
f. Target faces toward shooter - commence firing.
(1) Start positive trigger pressure.
(2) Shift concentration to perfecting sight alignment.
g. First shot is fired (Surprise Shot).
(1) Maintain eye focus (follow through).
(2) Quick recovery with the sights approximately in alignment, and hold approximately in center of aiming area.
(3) Renew positive trigger pressure.
(4) Strive to correct errors in sight alignment, but do not delay positive trigger pressure.
h. Follow through with four more surprise shots.
i. Good rhythm indicates coordinated application of the fundamentals.
E. MAKE AN ANALYSIS
Complete and instantaneous shot analysis is a prerequisite for improvement in performance or score. It is a complete waste of time and ammunition to fire haphazardly without any comprehensive attempt to improve. A mental impression of the sight alignment should come at the instant the shot breaks.
It is advantageous to analyze why you are shooting well on a particular day. Some shooters have a tendency to ignore their good scores. It is important to analyze the good shot string so the combination of factors that produce these good strings can be remembered and repeated. In making the analysis, an important point to remember is to be honest with yourself and your coach. By admitting mistakes the shooter can correct them. The coach can help find a solution to mistakes which he was not aware of if you reveal everything you saw, heard or thought of during the firing of the shot or string.
If any shooter critically re-examines and analyzes his performance and his technique of shooting, he will find "minor points", which to a certain extent hinder him from improving his results. The elimination of individual shortcomings and poor methods are the method the shooter has at his disposal to increase his competitive stature.
1. Slow Fire
a. Steps:
(1) Call each shot. Base your call primarily on the relationship of the front and rear sight. Also consider any unusual occurrences in the arc of movement and whether or not concentration on sight alignment was maintained.
(2) When you have decided where your shot should be located on the target, verify your call by observation with the spotting scope.
(3) If the shot or call is good or bad, determine the cause. Generally one of the following situations will occur:
(a) Shot call and shot location coincide and you have a good shot.
(b) Shot call and shot location coincide, but shot is bad.
(c) Shot call and shot location do not coincide.
NOTE: ANY TIME YOU FAIL TO RECOGNIZE THE ERROR, YOU MUST EXAMINE YOUR PLAN TO MAKE SURE YOU HAVE NOT NEGLECTED A FUNDAMENTAL.
(4) Evaluation: Now consider the question - Did you or did you not follow the planned sequence? If your answer is yes and you had an acceptable shot, this should stimulate your confidence. Review the technique you used to deliver the successful shot. Make every effort to reestablish the same conditions that existed for the first controlled shot and repeat the sequence for each succeeding shot. If your answer was no, you must identify the specific point in your shot sequence where control was lost. The following examples cover only a few of the errors that may have occurred:
(a) Failure to establish a minimum arc of movement.
(b) Inability to maintain point focus on sight alignment.
(c) Concentration drifts from sight alignment to trigger control.
(d) Trigger pressure intermittent and uncertain with considerable effort required to fire the pistol.
(e) Lack of aggressive, determined attitude, and confidence in the technique.
b. The shooter's slow fire work sheet lists the following steps as a guide to complete shot analysis:
(1) Follow through check.
(2) Call shot (describe sight alignment).
(3) Compare target hit location with shot call.
(4) If shot or call is bad, determine cause.
(5) Watch for error pattern to form. (Same error on more than one shot)
(6) Did shot break in normal arc of movement?
(7) Did you hold too long?
(8) Did you apply positive trigger pressure?
(9) If you benched weapon on a shot effort, why?
(10) Did you lose concentration? (What did you think about other than sight alignment?)
(11) Did you get a surprise shot break?
(12) Were you worried about results?
2. Strings of Five Shots :
After each five shot string, the shooter should remember each shot as one of five individual sight alignments that enables him to accurately call the shot group. If the call and the group are not together it is necessary to determine the cause and apply positive correction. If the group is not centered then the weapon isn't zeroed, the position was bad or the grip incorrect. If the shooter is sure of the zero of his weapon, then quickly check out the position and grip before firing the next five shot string. Look for one of the five following situations to occur. (It is possible however, for two or more of the situations to occur in one string. )
a. Shots off call and grouped within ability to hold, but not centered on target.
b. Shots on call but group larger than normal holding ability and may or may not be centered on target.
c. Shots off call, group larger than holding ability and may or may not be centered on target.
d. Shots on call grouped within ability to hold, but off center on target.
e. The shooter's rapid fire worksheet lists the following steps as a guide to complete shot group analysis:
(1) Follow through the proper recovery checkout.
(2) Shot group call (describe five individual sight alignments).
(3) Compare group location with call.
(4) If shot group or call is bad, determine cause.
(5) Did you get a surprise break on each of five shots?
(6) Was the first shot fired on time?
(7) Was rhythm maintained throughout string including last shot?
(8) Did all shots break in normal arc of movement?
(9) Did you apply positive trigger pressure on each of five shots?
(10) Did you lose concentration during string? (What were you thinking of)?
(11) Did you ignore minor errors in hold?
(12) Were you worried about results?
F. POSITIVE CORRECTION (If Necessary)
1. After a shot analysis, corrective measures have to be incorporated into the shooter's performance if the error is to be avoided on the next shot. Slipshod analysis, if any, is usually compounded by the absence of corrective action. Without analysis and corrective measure, improvement is at an end. The shooter who has not learned what he is doing wrong, or what to do about it if the trouble is found is lost and will never excel.
2. Corrective measures prevent the recurrence of poor performance and must be immediately applied. Much has been written about why we shoot poorly; however, it is just as advantageous to analyze why you are shooting well on a particular day. It is more helpful to know the right way to perform than to have your mind cluttered with a multitude of "don't". Coaches in particular should concentrate on and emphasize the positive factors.
3. Look for, analyze and correct mistakes every time a shot is fired.
4. There must be agreement on corrective measures between coach and shooter. The coach must explain the reasons for specific corrective measures recommended.
G. USING ADDITIONAL AIDS TO ORGANIZE A SYSTEM OF SHOOTING
1. The sight adjustment card furnishes information on sight capabilities, aids in obtaining a zero and provides a convenient record of sight settings for all caliber weapons.
2. The preparation check sheet provides a convenient list of actions necessary to shoot successfully.
3. The pistol scorebook: The pistol scorebook is a valuable aid to the competitive pistol shooter. It is an individual shooter's record of all firing by stage, such as slow, timed, and rapid fire, plus National Match Course and the value of all shots fired should be recorded. Practice scores should be kept separate from Match Scores.
The score book is valuable only if it is kept accurately and up to date. Record the bad scores as well as the good ones. By keeping the scorebook accurately it will be an aid in finding weak points in the shooter's performance. The scorebook will show over a period of time a trend in the shooter's progress. It will reflect progress in the different stages of fire. Averages may also be kept in the scorebook for each stage of fire. Record of ammunition used, sight adjustment, windage, and elevation, weather, light, wind, temperature, may be an aid to the shooter at a later day. There are many type scorebooks that will do the job well, but choose the one that is simple and will furnish the data you need quickly. An example of pistol scorebook page appears on the following page.
4. Due to the great number of functions necessary for the shooter to apply in exercising control of his shooting, a worksheet for both slow and rapid fire is furnished.
a. The slow fire worksheet provides the shooter with a guide to organization and application of a system for the control of a slow fire shot.
b. The timed and rapid fire worksheet provides the shooter with a guide to the organization and application of a system for the control of a five shot string of timed or rapid fire.

Figure 4-4. Example of the Pistol Scorebook Page.
H. ORGANIZED TRAINING
The champion shooter must be capable of intense concentration and have the sheer guts and determination to adhere to the application of fundamentals in spite of match pressure, adverse weather conditions, discouragement, gun trouble and possible sickness. The best method of sustaining good performance is good organization. To shoot well, do more of the little things right. If you are well organized, overall superiority will result. The knowledge of a systematic approach to controlled shooting must be thoroughly ingrained in the minds of all shooters. The "edge" lies with the shooter with a system.
It should be added that any system will be worthless to a shooter who has indifferent attitudes toward training and who turns the training sessions into a fixed routine, repeating in robot-like fashion the prescribed shooting aspects of a competitive shooter's activity. It requires not only systematic and painstaking work, but a thoughtful analysis of his work, continuous striving for the new and better, a bold search for the best, and an unwavering strengthening of his will. Only such work on his own shooting methods will turn a shooter's training into a reliable means of assuring his further development and make it possible for him to win.
SLOW FIRE WORKSHEET
PREPARATORY (In assembly area) 1 2 3 4 5 6 7 8 9 10
1. Squadding - Proper Relay & Target
2. Using clean weapons - Proper Caliber
3. Proper sight setting (Zeroed)
4. Blacken sights
5. Ammunition, Ear Plugs & Screwdriver
PREPARATORY (On firing line)
6. Focus scope on proper target
7. Dry Fire for natural Position & Grip
8. Adjust ear plugs
9. Ammunition loaded into magazine
10. Mental Stimulation of Confidence
PLAN DELIVERY OF SHOT (Review Shot Sequence)
11. Extend arm & breathe deeply
12. Settle into minimum arc of movement
13. Pick up sight alignment in aiming area
14. Take up trigger slack - apply initial pressure (take final breath and hold part of it)
15. Maintain sight alignment and minimum arc of movement
16. Start positive trigger pressure
17. Concentrate point focus on front sight
RELAXATION
18. No unnecessary muscular tension (Relax each major portion of body)
DELIVER SHOT (Follow Plan - No Compromise)
19. Follow Through (Continue all control factors)
20. Shot fired as a surprise - No reflex action
SHOT ANALYSIS
21. Call Shot - describe sight alignment
22. Compare hit location with call
23. If shot or call is bad, determine cause
24. Watch for formation of error pattern
25. Did shot break in minimum arc of movement?
26. Hold too long?
27. Positive trigger pressure?
28. Benched weapon why?
29. Lost concentration?
30. Surprise shot break?
31. Worried about results?
POSITIVE CORRECTION (Prompt Application)
32. Include in plan of delivery of next shot.
RAPID FIRE WORKSHEET
PREPARATORY (In assembly area) 1 2 3 4
1. Squadding - Proper Relay and Target
2. Using clean weapons - Proper Caliber
3. Proper sight setting (Zeroes)
4. Blacken Sights
5. Ammunition, Ear Plugs & Screwdriver
PREPARATORY (On Firing Line)
6. Focus scope on proper target
7. Dry fire for natural position & grip
8. Adjust ear plugs
9. Ammunition loaded into magazine
10. Mental Stimulation of Confidence
PLAN DELIVERY OF STRING (Review Sequence)
11. Extend arm & breathe deeply
12. Find sight alignment
13. Find aiming area on edge of target frame (Final deep breath)
14. Settle into minimum arc of movement
15. Point focus on front sight (partly release breath)
16. Take up slack - Initial pressure
17. Maintain sight alignment & minimum arc of movement (Target faces)
18. Start positive trigger pressure
19. Concentrate on sight alignment (First shot is fired)
RELAXATION
20. No Unnecessary Muscular Tension (Relax each major portion of body)
DELIVER STRING OF FIVE SHOTS
21. Follow through and recover with good sight alignment and central hold on each shot of string
SHOT GROUP ANALYSIS
22. Group call. Describe five individual sight alignments
23. Compare group location with calls
24. If group or call is bad, determine cause
25. Surprise break on each of five shots?
26. First shot on time & rhythm maintained?
27. Did shots break in minimum arc of movement
28. Positive trigger pressure?
29. Lost concentration?
30. Ignored minor errors?
31. Worried about results?
POSITIVE CORRECTION (Prompt Application)
32. Include in plan of delivery of next five shots
1. Preparation: In assembly area and on firing line |